Tagged: panorama photo

Death Valley November 2012 Photo Trip

Earlier this month I again went out to what has become a favorite location for photography of mine – Death Valley National Park. The goal was to once again work on low-light, night and long exposure techniques for the most part at night and do fun exploring and typical dawn, dusk and HDR work during the day.

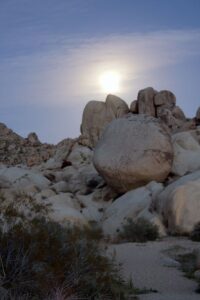
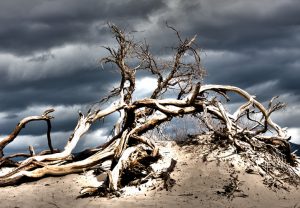
The technique I was most focused on this time was exposure stacking, which is a Photoshop technique where a series of short-ish long exposures of the night sky are layered together to achieve the same visual effect as a single long exposure. The image below is the most successful example I have from the trip; a mesquite bush on a sand dune with a series of 60 20-second-long exposures to give a total exposure effect of 20 minutes. The mesquite bush was lit for a few minutes with a hand-held flashlight using a painting-with-light technique.

A Moonlit Scene Looking West to the Panamint Range from Death Valley National Park’s Harmony Borax Works site

The stacking technique is superior to the single long exposure technique for me now for several reasons. First, the sky stays black since the 20 seconds at f4.5 and ISO 100 exposure used in this case is not enough to lighten the sky. Second, sensor noise does not build to a detectable degree with a 20 or 30 second exposure. I believe my workhorse Canon 40D may be getting “old” because it seems that longer (multi-minute) exposures are much noisier now than they were even 2 years ago.

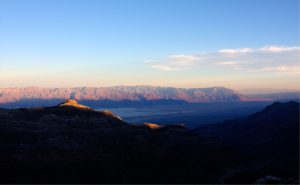
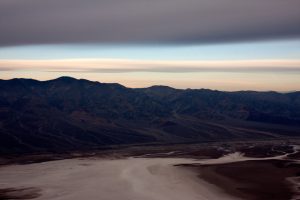
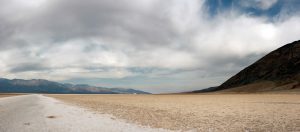
This next photo is a late afternoon 3-image HDR shot looking east across the valley at the Amargosa Range from 6400 ft (2000 m) high Aguereberry Point in the Funeral Range very near Telescope Peak. This was a 6 mile improved gravel road drive that my 2005 Camry was able to do, much to my surprise and delight. I arrived at the overlook about an hour or so before the sun dropped below the Sierras and Panamint Ranges and I was able to get a few panoramas and HDRs of the views.

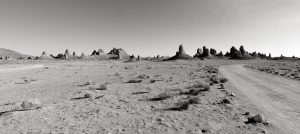
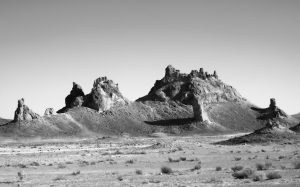
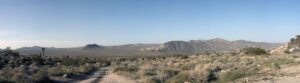
Another site visited was Trona Pinnacles, which I visited on the drive out to the park. Trona Pinnacles is in the California Desert National Conservation Area and is an unusual set of tufa formations. They have been the site of many film and advertising shoots and are unusual looking. They were formed from between 10 000 and 100 000 years ago, when the area was a large Pleistocene Era lake.

A multiple image panorama of the Tronas Pinnacles

A three image HDR photo of the Tronas Pinnacles in Tronas, CA


I have an album of photos from this Death Valley trip in my photo gallery immediately next to the Anza Borrego night sky photo.
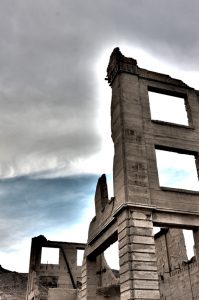

Death Valley February 2012 Photography Trip

Earlier this month I spent a long weekend in Death Valley National Park on a photo safari. Death Valley is a favorite destination for me because it is typically fair weathered and clear skied during the day and night. I had timed my visit to correspond with a waning full moon with the idea that I would do a lot of long exposure work using the light of the moon to illuminate the desert floor and mountains.

Unfortunately the weather was not cooperative; beautiful cloud-filled skies during the day and complete overcast at night (!) meant that my primary goal was not met. Instead I did a lot of panorama and HDR photography during the day and experimented with flash and “painting with light” techniques at night.

This is the overlook from Dante’s View of the Badwater Basin area – it’s looking due west. The moon had risen just a few minutes prior to opening the shutter. The image is 1408 seconds, roughly 25 minutes. The cloud cover has already moved in, blocking the stars and the sky to the west. But it is worth noting that even under these conditions there is sufficient light to expose the floor of the salt pan at Badwater and to illuminate the sky. Star trails are faint but visible in larger versions of this image, too. So, this is a failed image but a success at proof-of-concept.

This is a 3-image +/- 1 f-stop HDR image of a mesquite tree on a sand dune near Stovepipe Wells. I deliberately went for a more surreal look to the HDRs I took here.

Rhyolite, Nevada’s Cook Bank Building in silhouette

The Cook Bank Building at the ghost town of Rhyolite, Nevada. 3 image +/- 1 f-stop HDR image.

A 10 image panorama of Death Valley’s Badwater Basin area.

An old pulley on mining equipment at Death Valley California’s Warm Springs Campground

Some Depression-era mining equipment at Warm Springs Camp. Accessible by Jeep, Warm Springs is a former mining camp nestled in a small valley in the middle of the Funeral Mountains on the western side of Death Valley. The spring there is constantly flowing and was used as a source to fill a large swimming pool (visible in the Google Maps link) at the camp.


I have an album of photos from this Death Valley trip in my photo gallery immediately next to the U2 Joshua Tree photo.


Joshua Tree National Park Full Moon Photography

This weekend was a lunar perigee full moon. These don’t happen all that much together; perigee is the moon’s closest point to Earth in its orbit so the net result is an ever so slightly larger and therefore brighter moon. I decided to take advantage of this situation by driving to Joshua Tree National Park, a roughly 3 hour trek. I left the house around 12:30 PM and arrived at the Visitor’s Center at the northern edge of the park at 3:00 PM. A quick discussion with a ranger, a purchased entrance fee and off I went into the park. I ended up driving on the Geology Tour Rd and Queen Valley Rd (both unimproved) before deciding on hanging out along a stretch of Geology Tour Rd. The ranger assured me that area would very dark and pretty much devoid of people.

I stopped at the very southern corner of Geology Tour Rd and shot this panorama looking north of Pleasant Valley.

I found a good turn-off next to the road and set up. The moon rose above the rock formations and I took this image.

The full moon is behind a cloud. This was an ominous beginning; the clouds were coming in from the coast in front of the rain storm that hit us the next day. The clouds cut down the light available and made exposure estimation that much harder.

This was a multiple-minute exposure of a granite rock outcropping just off the road.

Eventually the clouds became so heavy I had to abandon the activity; the light was less than half what it was at the beginning of the evening.

Lessons learned:

1. Bring extra batteries. I went through a double battery pack in 3 hours of shooting. The long exposures really drain the batteries.
2. Next time I’ll get a hotel room out there and work all night instead of feeling like I had to get done by a certain time so I could safely drive home.
3. Give more time for location scouting.
4. Improve my autofocus management technique.


If you are planning a visit to Italy soon I have written 2 walking tour guide books to Rome that you can purchase here or at Amazon or Barnes and Noble.

I have an album of photos from Joshua Tree National Park in my photo gallery.


Panorama Photography

Panorama Basics

Panorama images have become a favorite photographic technique for me. I really enjoy making huge panoramic, sweeping images from multiple exposures. Panorama photography is easy to do; you don’t need a special camera and in some cases you don’t even need any particular special technique.

For example, this panorama of Death Valley’s Racetrack Playa was created by taking 5 individual exposures and using Photoshop’s built-in panorama function.

Death Valley Racetrack Playa Grandstand

This image – as many of mine are – was hand-held. This panorama of Panamint Valley was created with 12 or 14 imagesĀ  (6 or 7 across 2 rows) and is a huge file.

Death Valley Panamint Valley

For a basic panorama you should carefully set up your shot and have about 20% to 25% overlap from image to image. I always hold the camera in portrait orientation for horizontally-oriented panos and in landscape orientation for vertical panos.

You should set the camera’s exposure mode to Aperture Priority to ensure that the depth of field does not change from image to image and you should also remove the polarizer filter if you have one attached to the front of the lens. Aperture priority means you select an “f-stop” (the lens aperture) and the camera will select a shutter speed appropriate for the conditions. All of this assures that each image’s exposure will be similar and will look natural when they are all stitched together.

Advanced Panorama Techniques

When capturing images of objects or scenery far away relatively speaking, a handheld approach provides good results. But, when a panorama of close-in objects or a scene is desired, the proper technique and the proper equipment is required. The workflow with the camera is the same, but rotating the camera around it’s nodal point and eliminating parallax is vital.

Another approach is to use a robot, such as the Gigapan product line. The cost differential between a full-blown Really Right Stuff manual set up and a Gigapan set up is minimal, with the advantage to RRS that no batteries are required and the advantage to Gigapan that the process is automated.

Stitching Software

Many software options exist (Mac OS X search); the Gigapan system comes with it’s own software, Photoshop CS3 and above has a panorama mode included. I have used Kekus Software’s PTMac software as well as their Calico product. Most of these are a lot more “hands off” and designed for ease of use. They have a lot of internal smarts and can do a top-notch job of merging the individual images into a gorgeous panorama image.

PTMac, however, is fundamentally different from these others; it is designed to give you the most control possible in selecting overlapping control points from adjacent images and save those control points as a file which can be used for subsequent panoramas. Why would you want to do that? Well, the most important application is if you want to do an HDR panorama. You can do it two ways; you create individual HDR images for each panorama segment and then stitch them together, OR you can stitch each set of image exposure sets and then HDR the 3, 5, 7 or more panoramas into an HDR image. But to do that, you must stitch all the exposure sets using the same control points; otherwise you’ll get alignment and registration problems when you try to build the HDR image.

Final Image

This panorama of Mission San Luis Rey de Francia in Oceanside, CA was shot at night and used 3 rows of 5 images each. I have several others similar to this at my Southern California gallery at my photo gallery (Alan R Zeleznikar Photography).

California Oceanside San Luis Rey Mission